 I know there are lots of different backup tools for Linux and that many people recommend Mondo Rescue but I have never been able to make it work properly (my last attempt resulted in 8 DVD images totaling 31 GB – The source of the backup was 140GB), no doubt my own fault.
So I decided to write down how I made backup and bare-metal restore using rdiff-backup work for my own future reference; and what better place to write it down than in my own blog :)
I am using an external (USB) disk for backups.
First, the backup
Instead of having to run everything by hand each time, I quickly created a script for my backups:
If you want to create the backup on another server, first setup key-based SSH login to the remote server.
Here is a short guide if you do not already have key based authentication running
- Create a new ssh key on the source server (for root):
$ sudo ssh-keygen -t dsa
Generating public/private dsa key pair.
Enter file in which to save the key (/root/.ssh/id_dsa):
Created directory '/root/.ssh'.
Enter passphrase (empty for no passphrase):
Enter same passphrase again:
Your identification has been saved in /root/.ssh/id_dsa.
Your public key has been saved in /root/.ssh/id_dsa.pub.
The key fingerprint is:
16:b6:a3:a9:f2:f4:d3:37:3d:b1:fe:df:8a:00:03:a9 root@bender
The key's randomart image is:
+--[ DSA 1024]----+
|                 |
|       .         |
|      o o        |
|     . o o       |
|    E   S        |
|       + +  .    |
|    . o.  .. o   |
|  .. o. . o.+.  .|
|   oo .. . oooooo|
+-----------------+
 ```
 Note: Fingerprint and randomart will differ.</li>
- Copy the contents of
/root/.ssh/id_dsa.pubon the source machine to~user/.ssh/authorized_keyson the destination machine. While it is possible to connect as root I recommend using a non-privileged user. - Test the connection:
# ssh user@remote
Both scripts need to run as root on the source machine.
Restore
First of all: Test your restore!. Nothing feels worse than a useless backup. Use a virtual machine to test your backup.
- Download a boot CD (and boot it). Some steps of the restore requires Internet access so keep you wireless details handy (if applicable)
- rdiff-backup is not included on the live CD, so we need to “install” it. Go to the System → Administration and select Synaptics Package Manager, select Settings → Repository and enable the universe repository
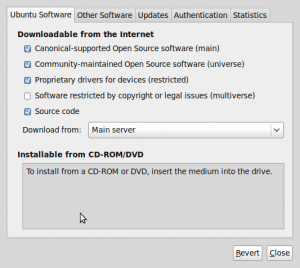 When you click Close, you will be informed that you need to click the Reload button (please do)
 - Close Synaptics and open a terminal (Applications → Accessories → Terminal) and install rdiff-backup by running
sudo apt-get install rdiff-backup - Create a new partition table using GParted (found in System → Administration), the size of each partition can be found in
/media/usbdisk/backup/etc/sda.sfdisk- the filesystem type of each partition is found in/media/usbdisk/backup/etc/fstab - Mount filesystems for the restore; in my case I took the filesystems listed in
/media/usbdisk/backup/etc/fstab:/dev/sda1 / ext3 relatime,errors=remount-ro 0 1 /dev/sda6 /home ext3 relatime,user_xattr 0 2This translates to:
$ sudo mount /dev/sda1 /mnt $ sudo mkdir /mnt/home $ sudo mount /dev/sda6 /mnt/home - We are now ready to restore:
$ sudo rdiff-backup --force -r now -v5 /media/usbdisk/backup /mnt
The force flag is needed because some of the destination directories are present at target. - Next step is to reinstall grub into the MBR and fix
fstab. - First set up and enter a chroot:
$ mount -t proc none /mnt/proc
$ mount -o bind /dev /mnt/dev
$ mount -o bind /sys /mnt/sys
$ sudo chroot /mnt /bin/bash
All work done from this point on is done with the actual data from your old system. 1. Now find the UUID of your partitions:
# blkid
/dev/sda1: UUID="ff98e4b0-2383-42f7-9812-cd05af1498ea" TYPE="ext4"
/dev/sda5: UUID="a1d38cf3-2a8a-4ca4-b1ee-5f7fcb43d51b" TYPE="swap"
/dev/sda6: UUID="c64dcaa8-2bad-4ecd-b984-ed6b2718b985" SEC_TYPE="ext2" TYPE="ext3"
 1. Open `/boot/grub/menu.lst`, locate `kopt=` and `groot=` and then change the UUID value with the one corresponding to the value of your root filesystem above
 1. Open `/etc/fstab` and change the UUID values to match those above
 1. Install grub: `# grub-install /dev/sda`
 1. Update the grub configuration: `# update-grub`
 1. Optional: Open `/etc/udev/rules.d/70-persistent-net.rules` and remove the rule for eth0 if you are moving to new hardware
 1. Exit the chroot: `# exit`